How to Transform a Pool Noodle into A Tentacle
- Jane Sawyer Makes
- May 3, 2024
- 3 min read
Watch the video tutorial here!
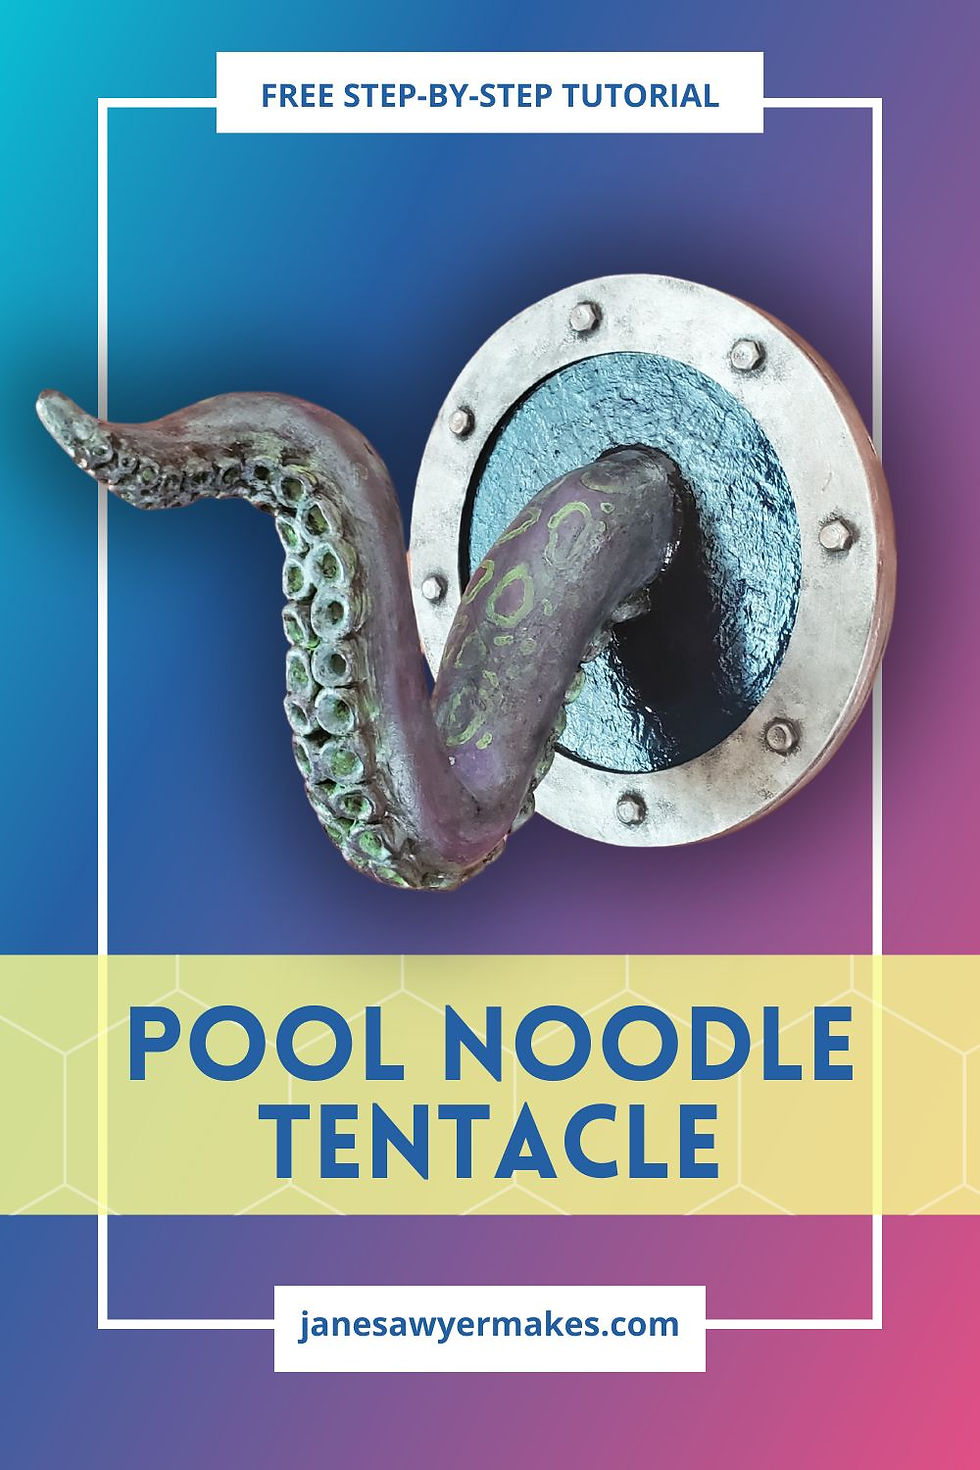
The Kraken is a legendary sea monster of maritime folklore. It's usually described as a giant octopus-like creature with massive tentacles that are used to drag ships to their doom beneath the waves. Let’s make a sculpture of one those iconic tentacles reaching through a porthole.
This paper mache tutorial will show you how to transform a pool noodle into an octopus or kraken tentacle. I’ll walk you though it step-by-step below. You can also check out the tutorial video here.
You'll need the following tools and supplies to DIY your own pool noodle tentacle craft:
pool noodle
fibreboard wreath form (or something similar)
fencing wire
masking tape
papermache supplies
cardboard (or pressboard)
white glue
DAS air-dry clay
painting supplies
bread knife, craft knife
painting tools
drill (optional)
spoon, comb, kitchen scrubby

STEP 1: Shape the Noodle
Use a kitchen bread knife to saw through the foam.
Carve the foam away to create a long, tapered tentacle. Cut off any extra length
Use a scrap to fill the hole in the noodle.

STEP 2: Attach Wire
Use a kitchen bread knife to saw through the foam.
Carve the foam away to create a long, tapered tentacle. Cut off any extra length
Use a scrap to fill the hole in the noodle

STEP 3: Bend the Tentacle
Bend the tentacle into shape.
Check how your sculpture looks from different angles.
Consider how the sculpture will sit against the wall and adjust or trim if needed.

STEP 4: Create The Base
Cut some circles for the base of the sculpture. You can use a couple layers of corrugated cardboard or some pressboard or plywood for this.
Secure the tentacle to the base using the wires and lots of hot glue.

STEP 5: Paper Mache
Apply several layers of paper mache to the sculpture. Cover the noodle and the circular base.
4-6 layers of paper mache will give your sculpture enough strength to hold a small lamp.

STEP 6: Apply Paper Clay
Cover the dried paper mache with a thin layer of paper clay. This will add lots of strength to the finished sculpture.
Press the clay onto the sculpture with the back of a spoon.
Use a raking technique with a comb to smooth out bumps in the clay. Smooth out the rake lines with a damp kitchen scrubby.

STEP 7: Add Suction Cups
Roll small balls of clay and press the handle of a paintbrush partway into the center.
With the ball still on the paintbrush, dip it into some glue.
Press the gluey-ball onto the tentacle and pull out the paintbrush.
Make the suction cups bigger as you move down the sculpture.

STEP 8: Assemble the Porthole
Glue the wreath form to the sculpture.
Add a backing to hide the wires.
Flush up the sides and fill any gaps.

STEP 9: Paint and Finish
Use your favourite paint technique to paint your project.
A glossy clearcoat can make the project look wet - like the kraken just climbed up from the depths of the ocean!

STEP 10: Attach Hardware and Hang
Add a sawtooth hanger or some screws and picture-wire to the back of your sculpture.
Use weight-appropriate hanging hardware to mount it on the wall.

And now you have a kick-ass kraken sculpture! You can check out the tutorial video below or find lots of other budget-friendly sculpting projects on my YouTube Channel.
If you give this technique a try, it would make my day if you’d share it with me. I’m @JaneSawyerMakes on TikTok, Instagram, Pinterest, Reddit, Threads, and Twitter (X). Please share and pin this article!


Comments