How to Sculpt Almost Anything with Paper Mache!
- Jane Sawyer Makes
- Jan 18
- 3 min read
Updated: Dec 5
Watch the step-by-step video tutorial HERE!
If you can make a paper mache blob, you can make almost any paper mache sculpture you can imagine! How do I know this? Because Squishmallow has already done it! This company has taken a big squishy blob and turned it into almost anything you can imagine—And if Squishmallow can do it, so can you!
In fact, if you want to make an easy papier mâché sculpture of any character, I recommend doing a quick internet search to see if Squishmallow has done it first. With over 3000 designs to choose from, you can probably steal some inspiration!
With that in mind, let me show you how to make a paper mâché blob that you can transform into almost any sculpture you can imagine.

Step 1: Prepare a Bag and a Cardboard Circle
The body of the sculpture starts with a paper bag. I'm using a paper lunch bag that measures about 13cm (or 5") wide by about 27 cm (or 10 ½ ") tall.
To make a nice flat base for your sculpture, cut a circle from corrugated cardboard that has a diameter equal to the width of your paper bag. My circle has a diameter of 13cm (or 5").

Step 2: Soften the Bag and Glue on the Base
Crunch and un-crunch the paper bag a few times so it's not so crisp and rigid.
Apply a generous amount of hot glue to the cardboard circle.
Stick the bag down onto the circle, using your hand on the inside to press the bottom of the bag towards the edge of the circle.

Step 3: Stuff the Bag
Use clean filling material to stuff the bag. Tissue paper, plastic bags, packing materials, and balloons all make great, repurposed filling materials.
Stuff the bag carefully and firmly. Pay attention to the smoothness of the sides of your sculpture.

Step 4: Close the Top and Smooth with Tape
Fold the top of the bag into the center and close the top with 2" masking tape
Use the masking tape to cover smooth over any gaps or creases you don't like. (Think of it as covering the rough areas with a big bandage made of masking tape!)
Step 5: Cover with Paper Mache
Use your favourite paper mache method to cover the blob in 2-3 layers.
I have an article summarizing what I think is the BEST method and BEST paper mache paste recipe here.
I also have a really detailed paper mache basics video that is jam-packed with great paper mache sculpture tips here!
Let the paper mache dry really well in a warm, dry place.


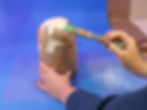
Step 6: Add Whatever Features You Want!
When the paper mache is dry, you can add whatever features you'd like to your blob sculpture!
Here's a list of materials that can help you add the features to your paper maché sculpture. So many of these are common household items you're probably already got!
Paper egg cartons – Can be cut into sections for snouts or bugged-out eyes.
Disposable cups – Make good snouts or hats
Corrugated cardboard – Great for shaping ears and other sturdy structures.
Plastic lids – Can be cut in half for ears or a duckbill.
Sticks – Can be used as horns, antlers, or limbs.
Drinking straws or pipe cleaners – Great for antennae or wiry hair.
Aluminum foil – Can be formed into long snakes to sculpt bendable shapes from scratch. Perfect for long tails or tentacles!
Toilet paper rolls – Can be cut and shaped into arms or other limbs.
Air-dry clay – Useful for sculpting eyeballs, teeth, or other small accessories.

I turned my blob into a jackalope (which is a cryptid creature that looks like a rabbit with antlers).
If you want to check out how I made bunny ears with cardboard or antlers with aluminium foil, watch the build video here or read the article here!
If you give this tutorial a try, it would make my day if you’d share it with me. I’m @JaneSawyerMakes on TikTok, Instagram, Pinterest, Reddit, Threads, and Twitter (X). Find lots of other budget-friendly art projects on my YouTube Channel. Please share and pin this article