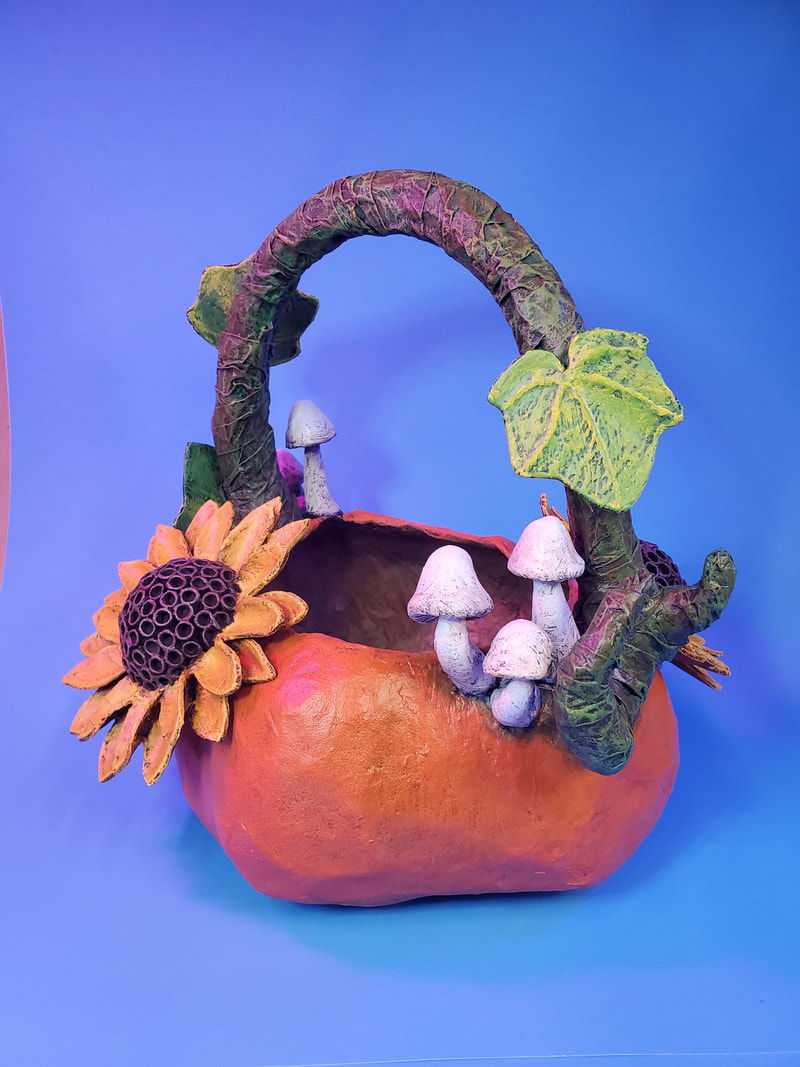
How to Make a Whimsical Paper Mache Pumpkin Harvest Basket
- Jane Sawyer Makes
- Nov 9, 2024
- 3 min read
Updated: Dec 5, 2025
Watch the step-by-step video tutorial here!
As the weather gets colder, it's the perfect time to get crafty. What better way to celebrate the autumn season than with a one-of-a-kind paper mache pumpkin basket? Whether you're looking for a charming centerpiece, a festive candy holder, or a unique addition to your fall decor, this project is as fun to make as it is to display. With a few basic materials and a bit of creativity, you can craft a basket that’s bursting with personality—whimsical vines, vibrant leaves, and even a sprinkle of sunflowers or mushrooms. This is a great beginner paper mache sculpture to bring a touch of handmade magic to your harvest season! Let’s do it!


Step 1: Hollow Out the Pumpkin
This project started out with a pre-made paper mache pumpkin. Check out this article or this video to see how it was done.
Cut a wide opening at the top using a serrated knife or a pen knife for precision.
Remove the lid and carefully separate the plastic bag from the paper mache by pulling it out bit by bit.
Smooth the cut edges by applying an extra layer of paper mache.

Step 2: Add the Handle
Use fencing wire to create a sturdy handle. Poke holes on opposite sides of the pumpkin and thread the wire through. Secure it with hot glue.
Wrap aluminum foil around the wire to bulk it out, adding a twisty vine-like detail at one end.
Cover the foil with masking tape (optional) and then a layer of paper mache, leaving wrinkles for texture.

Step 3: Craft the Leaves
Cut leaf shapes from craft foam or cardboard.
If using foam, use heat (like the tip of your glue gun) to mold and shape the leaves for a realistic look.
Add veins with hot glue and let them cool.
Laminating a bit of paper towel onto each leaf might help make painting easier later.

Step 4: Make Sunflowers
Use domed plastic pieces as the centers.
Cut paper straws into short sections and glue them around the dome to mimic sunflower seeds.
Cut petals from craft foam and glue them around the edges.

Step 5: Mushrooms
Sculpt stems and caps from Creative Paper Clay or DAS clay.
Attach the wet stems to the pumpkin with glue and let them dry before adding the caps.


Step 6: Prime and Paint
Prime the pumpkin, handle, and decorations with a DIY primer made from acrylic paint, glue, and cornstarch. This provides a smooth, durable base.
Use a dry brushing technique to add layers of color, starting with two mid-tones and finishing with a highlight for dimension.

Step 7: Assemble Your Basket
Attach the leaves, sunflowers, mushrooms, or other decorations to the pumpkin with hot glue.
Spray the entire piece with a matte clear coat to seal and protect your work.
Step 8: Display and Enjoy!
This project is incredibly versatile—swap out the sunflowers and mushrooms for bats and cobwebs for a spooky vibe or acorns and berries for a more natural look. You can totally customize your own paper mache sculpture!
If you try this project, I’d love to see your creations! Share them on social media and tag me.
And that's how you can make your own papier mache basket in the shape of a pumpkin! I thing it's very cute, and I know i'll be proudly displaying mine all fall. I'd be thrilled if you'd check out the tutorial video below or find lots of other budget-friendly art projects on my YouTube Channel.
Are you going to sculpt your own paper mache pumpkin basket? If you give it a try, it would make my day if you’d share it with me. I’m @JaneSawyerMakes on TikTok, Instagram, Pinterest, Reddit, Threads, and Twitter (X). Please share and pin this article!


